English
 中文简体
中文简体 عربى
عربى


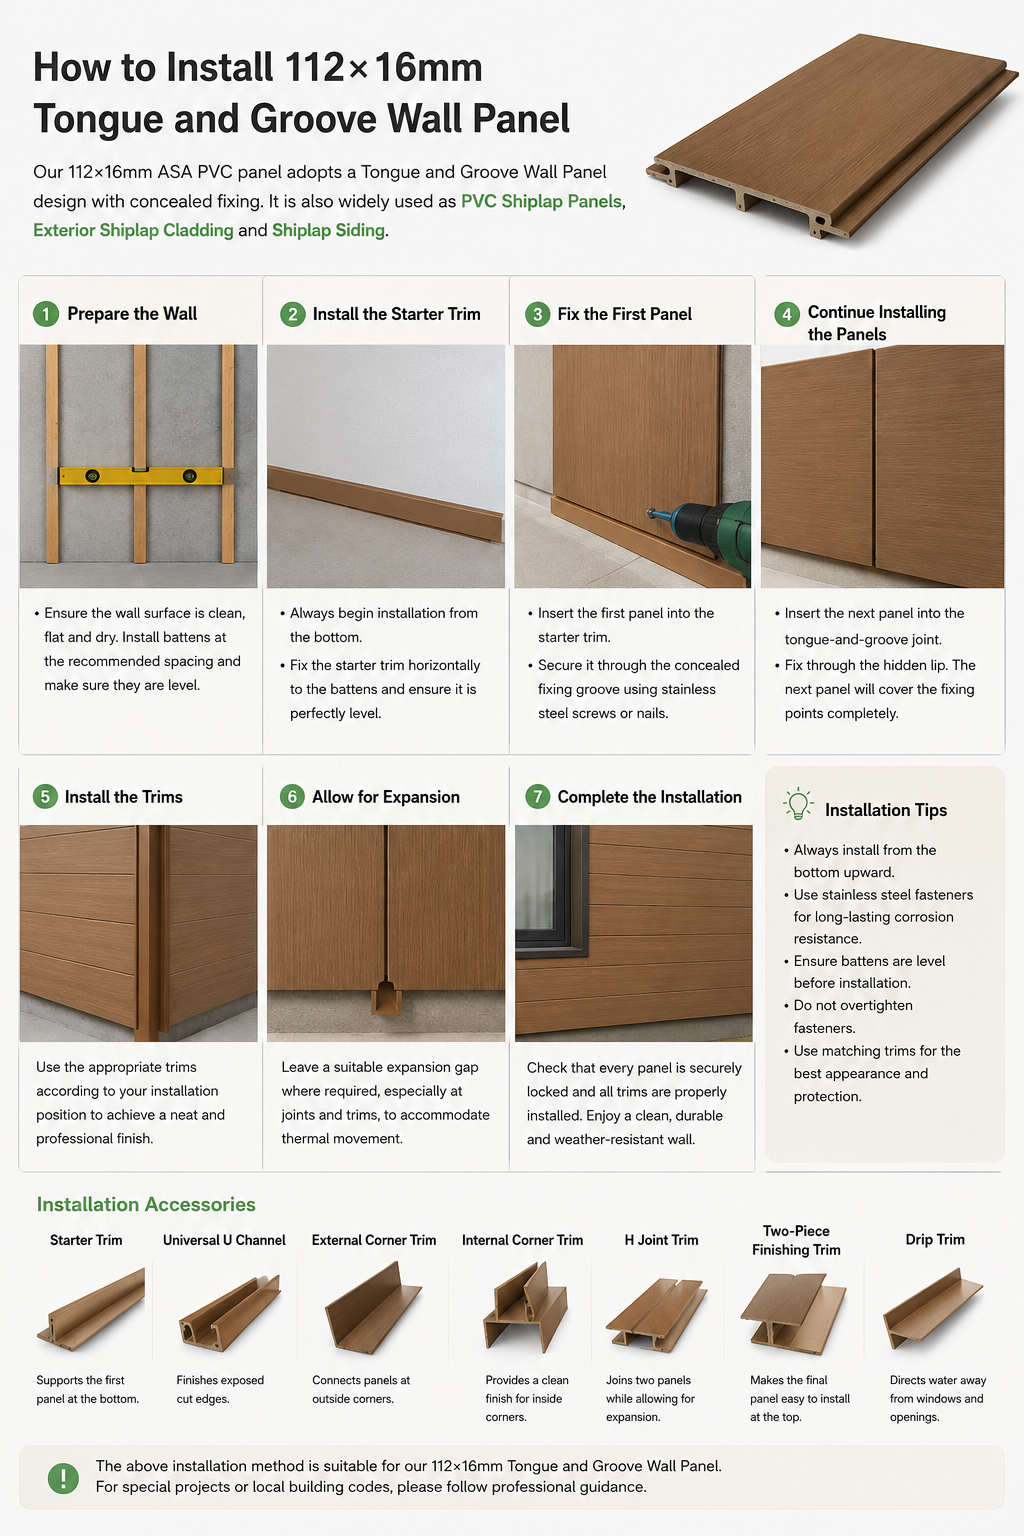
How to install PVC shiplap panels?
The 112×16mm ASA PVC panel features a Tongue and Groove Wall Panel design with a concealed fixing system, making installation fast, secure, and visually seamless. Whether used as PVC Shiplap Panels, Exterior Shiplap Cladding, or Shiplap Siding, the installation process remains the same.
Step 1. Prepare the Wall
Ensure the wall surface is clean, flat, and dry. Install timber or metal battens at the recommended spacing and make sure they are level before installation.
Step 2. Install the Starter Trim
Always begin installation from the bottom of the wall. Secure the starter trim to the battens, then insert the first Tongue and Groove Wall Panel into the trim to create a stable starting point.
Step 3. Fix the First Panel
Fasten the first panel through the concealed fixing groove using stainless steel screws or nails. The hidden fixing system keeps all fasteners out of sight for a clean, professional finish.
Step 4. Continue Installing the Panels
Insert each new panel into the tongue-and-groove joint of the previous panel and secure it through the hidden fixing lip. As each panel overlaps the fixing point, the fasteners become completely concealed, creating the continuous appearance commonly seen in PVC Shiplap Panels and Exterior Shiplap Cladding systems.
Step 5. Install the Trims
Complete the installation with the appropriate accessories for a neat and weather-resistant finish.
Starter Trim – Supports the first panel.
Universal U Channel – Covers exposed cut edges.
External Corner Trim – Connects panels around outside corners.
Internal Corner Trim – Provides a clean finish for inside corners.
H Joint Trim – Joins two panel lengths while allowing for thermal expansion.
Two-Piece Finishing Trim – Makes the final panel easy to install beneath soffits or windows.
Drip Trim – Directs rainwater away from windows and wall openings.
Step 6. Allow for Expansion
Leave a suitable expansion gap where required, especially at panel joints and trims, to accommodate thermal movement caused by temperature changes.
Step 7. Complete the Installation
After all panels and trims have been installed, check that every panel is securely locked in place. The concealed fixing system delivers a smooth, durable surface with excellent weather resistance, making it an ideal solution for Shiplap Siding, exterior facades, residential homes, commercial buildings, and other outdoor applications.
Installation Tips
* Always install panels from the bottom upward.
* Use stainless steel fasteners for long-lasting corrosion resistance.
* Ensure battens are level before installation.
* Do not overtighten the fasteners to allow for thermal expansion.
* Use matching trims to achieve the best appearance and weatherproof performance.